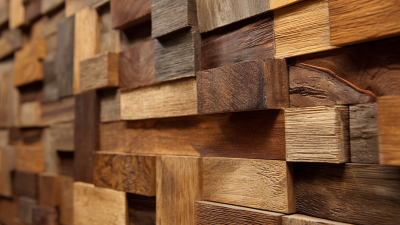
A Wood Slat Wall Panel can turn a blank wall into a textured backdrop for a sofa, desk, or headboard. Installation deserves careful planning. The U.S. Environmental Protection Agency reports that Americans spend approximately 90% of their time indoors. That figure makes interior material choices worth considering, including finishes, adhesives, and their suitability for occupied rooms. Details matter. A visible screw, uneven joint, or poorly cut socket opening can interrupt an otherwise attractive wall.
Wood also responds to its surroundings. The USDA Forest Products Laboratory’s Wood Handbook, published in 2021, explains how moisture affects wood dimensions. This makes acclimation, substrate checks, and manufacturer-specified clearances practical installation concerns. Check the actual product. Solid wood, veneered MDF, and felt-backed panels can require different fixings and cutting methods. Before marking your starting line, measure the wall at several heights and locate studs, cables, and outlets. An apparently square corner may reveal a noticeable taper when the final panel goes up.
Acoustic expectations need equal care. ASTM C423 provides a laboratory method for measuring sound absorption, but results depend on the tested installation assembly. A panel mounted directly against drywall may perform differently from one installed over battens and mineral wool. Attractive slats alone do not establish acoustic performance. It is tempting to prioritize speed; that choice deserves reconsideration when adhesive strength or wall condition remains uncertain. This guide explains how to prepare the surface, plan panel spacing, cut clean edges, and select suitable fasteners. The aim is a secure installation with consistent alignment and realistic performance expectations.

Wood slat panels usually come as solid timber, veneered MDF, or slats mounted on acoustic felt. Solid wood offers natural grain but responds to moisture changes. Veneered MDF provides consistent dimensions, although exposed edges need careful finishing. Felt-backed panels combine decorative slats with a porous backing. Check the core. A wood veneer does not make the entire panel solid timber, and felt alone cannot guarantee sound absorption.
Moisture affects material selection before installation begins. The USDA’s Wood Handbook (2021) places average wood fiber saturation at approximately 30% moisture content. Below that level, moisture changes cause wood to shrink or swell. This figure describes wood behavior; it is not an installation target. The EPA’s A Brief Guide to Mold, Moisture and Your Home recommends indoor relative humidity below 60%, ideally 30–50%. Measure room humidity, inspect damp patches, and follow the panel supplier’s acclimation instructions. Avoid guessing. For bathrooms, choose panels explicitly approved for the expected humidity and splash exposure.
Match installation materials to the wall substrate and panel weight. On plasterboard, locate studs and select suitable screws or rated cavity fixings. Masonry generally requires compatible plugs and screws. Use battens when the specified acoustic assembly requires an air cavity or insulation behind the panels. Request an acoustic test report showing the complete mounting arrangement. Adhesive-only installation looks appealing, but its suitability deserves scrutiny: weak paint can detach with an otherwise strong bond. A hidden fixing trial may reveal problems before an entire wall is covered.
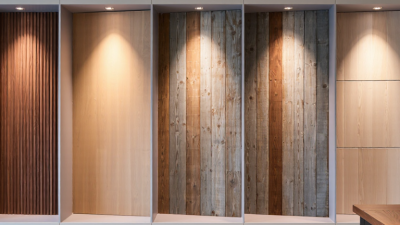
Wall preparation determines whether wood slat panels sit evenly and stay securely attached. Remove loose paint, dust, and wallpaper residue before checking the surface with a 1.8-meter straightedge. Mark raised spots and depressions with pencil. Repair unstable plaster and let fillers dry completely. Check for dampness. Covering a moisture problem makes inspection harder and can expose wood-based components to persistent humidity.
Allow panels to adjust to the room according to their installation instructions. The USDA Forest Products Laboratory’s Wood Handbook (2021) provides useful moisture data for solid wood. At approximately 21°C, wood reaches about 6.2% equilibrium moisture content at 30% relative humidity. At 50% relative humidity, that figure rises to approximately 9.2%. These figures explain why indoor conditions matter, although veneered panels and engineered backings can behave differently. Measure room humidity, investigate damp patches, and confirm that the substrate suits your chosen adhesive or mechanical fixings.
At approximately 21°C, wood reaches about 6.2% equilibrium moisture content at 30% relative humidity. At 50% relative humidity, that figure rises to approximately 9.2%.
Sketch the wall with sockets, switches, corners, and panel joints clearly marked. For a 3,000-millimeter wall using 600-millimeter panels, five panels fit nominally before allowing for clearances. Actual dimensions matter. Measure several panels before marking your starting line with a level. A centered layout may look balanced on paper but leave an awkward cut beside a socket. Reconsider that assumption before cutting. Dry-fit the first sections, check the slat spacing across joints, and follow the specified perimeter gaps.
Measure the wall at the top, middle, and bottom before marking your wood slat panels. Walls are rarely perfectly square, especially near skirting boards and ceiling corners. Transfer each measurement onto the panel’s back, checking which edge will remain visible after installation. Check twice. Allow the expansion clearance specified for your panel material instead of forcing a tight fit against adjoining surfaces. For uneven edges, use a cardboard template to trace the wall profile before cutting the actual panel.
Mark outlet openings from two fixed reference points, such as the floor and the adjacent panel edge. Switch off the relevant circuit and verify that the outlet is de-energized before removing its cover. Never cut panels while they are positioned over electrical wiring. Support the panel on a stable workbench, wear eye protection, and use a blade suitable for its construction. A jigsaw can handle rectangular openings, though tight corners may need careful finishing with a file. Cut conservatively. An oversized opening may extend beyond the cover plate, leaving a gap that requires replacing the cut section.
Around pipes, brackets, and light fixtures, test the shape on scrap material before cutting the finished panel. A slightly rough hidden edge can be acceptable; a cracked slat or obstructed mounting point needs correction. Keep electrical boxes accessible, and have a qualified electrician assess whether the added wall thickness requires approved box extensions. Dry-fit each section to check cover-plate overlap and fixture clearance before applying adhesive or driving screws.
The right fixing method depends on your wall, panel weight, and whether you plan to remove the panels later. Adhesive can work on clean, dry, firmly bonded surfaces when the panel manufacturer permits it. Dust, loose paint, and peeling wallpaper weaken the bond. Check adhesion first. Test a small area, especially on painted drywall, before committing to the entire wall. Choose an adhesive compatible with both the panel backing and wall surface, then follow its application instructions.
Screws provide mechanical support, particularly for heavier panels or installations over timber battens. Locate studs and check for concealed cables or pipes before drilling. On felt-backed panels, position approved screws through the felt between slats, where the heads remain less noticeable. Follow the specified fixing pattern rather than guessing screw spacing. Tighten each screw until secure without crushing the backing or pulling the panel unevenly against the wall.
Using adhesive and screws together can hold panels in position while the adhesive cures, provided the installation instructions allow both. Dry-fit each panel and mark its position before applying adhesive. Alignment can drift. A slightly uneven corner may leave a visible gap, so check the actual wall rather than trusting its edges. It is tempting to add more adhesive to correct unevenness, but that can leave inconsistent contact. Address significant wall irregularities before fixing, and maintain any expansion clearance required by the panel manufacturer.
Clean edges make wood slat wall panels look intentional, especially beside doorframes, sockets, and exposed corners. Measure the final opening at the top, middle, and bottom before cutting the last panel. Walls are rarely square. Use a fine-tooth blade and test your cut on an offcut to check for splintering. Cover exposed backing with compatible end trim, keeping adhesive away from visible wood faces. Where movement clearance is required, let the trim conceal it without tightly trapping the panel.
Moisture deserves attention before you close those edges. The USDA Forest Products Laboratory’s 2021 Wood Handbook reports equilibrium moisture content of approximately 6.2% at 30% relative humidity. At 50% relative humidity, that figure reaches approximately 9.2%, with both values measured near 21°C. These figures describe wood’s moisture response, rather than a universal installation gap. Follow the panel manufacturer’s acclimation and clearance requirements, particularly for solid-wood components. A tight-looking edge today may become a pressure point when indoor humidity rises.
Check alignment with a laser or long spirit level, then inspect slat spacing across every joint. Step back briefly. Shine a work light sideways across the surface to reveal uneven joints and projecting edges. Apply gentle hand pressure near corners and seams to check for lifting, clicking, or rocking. A slightly uneven joint might seem acceptable close up; side lighting can make that judgment worth reconsidering. Correct loose fixings according to the installation instructions before adhesive cures or trim restricts access.
| Inspection Area | Tools or Materials | Installation and Check Method | Acceptance Criteria | Corrective Action |
|---|---|---|---|---|
| Exposed Panel Edges | Compatible end trim, tape measure, fine-tooth saw, sanding block | Measure each exposed edge and cut the appropriate trim to fit. Smooth cut edges where the panel material permits, then attach the trim using the specified fixing method. | Trim covers the intended edge, sits securely, and has no sharp projections or visible damage. | Re-cut poorly fitting trim, smooth rough areas, and refit loose sections. Avoid sanding through thin veneer or decorative coatings. |
| External Corners | Compatible corner profile or suitable wood trim, square, measuring tape | Check the actual corner angle before cutting. Dry-fit the corner detail and secure it according to the trim and panel instructions. | The corner finish fits the wall geometry, covers exposed edges, and remains firmly attached. | Adjust the cut or use a corner profile suited to the actual angle. Do not force trim against an uneven corner. |
| Internal Corners and Perimeter Clearance | Measuring tape, spacers, compatible finishing trim | Maintain the perimeter clearances specified for the panel system, including at adjoining walls, ceilings, and floors. Use trim that preserves any required movement space. | Required clearances remain available, and panels are not forced tightly against adjacent surfaces. | Trim the affected panel edge and reposition the finishing trim. Remove filler or fixings that obstruct required movement. |
| Vertical Slat Alignment | Spirit level or laser level | Check a consistent slat edge against a vertical reference. Repeat the check across the installation to identify cumulative drift. | Slats follow the intended vertical layout without a progressive lean across the wall. | Reposition panels while adjustment remains possible. For secured panels, release the affected fixings using the approved removal method before realigning. |
| Panel Height and Horizontal Alignment | Laser level or spirit level, measuring tape | Compare panel tops, bottoms, and any horizontal joints with the chosen layout reference. Check the wall and ceiling separately because existing surfaces may be uneven. | Panel edges follow the intended reference line, with consistent detailing at the ceiling and floor. | Adjust panel position or scribe and trim the relevant edge to suit the surrounding surface while preserving required clearance. |
| Slat Spacing at Panel Joints | Measuring tape, suitable spacer, straightedge | Compare the spacing across adjoining panels with the spacing within each panel. Check several points along the joint. | The slat pattern continues consistently across joints, with no unintended overlap or abrupt change in spacing. | Adjust panel positions or the joint detail according to the panel design. Recheck vertical alignment after repositioning. |
| Surface Flatness | Long straightedge, work light | Place the straightedge across several slat faces and inspect under angled light for unexpected steps or bowing. | Adjacent panel faces form the intended plane and meet any flatness requirements specified for the system. | Check for uneven backing, trapped debris, or overtightened fixings. Correct the support surface or fixing pressure before refitting. |
| Mechanical Fixing Stability | Appropriate driver, specified screws and substrate-compatible anchors | Verify fixing type, quantity, spacing, and engagement against the installation instructions. Apply gentle hand pressure near edges and joints to check for unintended movement. | Fixings hold securely in the intended support, panels do not rock or loosen, and slats or backing are not crushed. | Replace unsuitable or stripped fixings and restore attachment to sound support. Tighten only as required for the panel system. |
| Adhesive Bond Stability | Compatible panel adhesive, temporary supports where specified | Follow the adhesive requirements for substrate preparation, application, temperature, support, and curing. Check stability only after the specified curing period. | After curing, bonded areas remain attached without unintended edge lifting or panel movement under gentle hand pressure. | Support loose panels and follow the adhesive supplier's repair procedure. Remove failed adhesive and prepare the substrate before rebonding where required. |
| Final Finish and Cleaning | Soft brush or vacuum brush attachment, finish-compatible cleaning materials | Remove dust and inspect trim joints, cut edges, slat faces, and visible fixings. Follow the finish instructions when removing adhesive residue or making repairs. | Surfaces are clean, trim is secure, and visible areas are free from sharp edges, loose debris, and unresolved installation damage. | Use an approved touch-up method for minor defects and replace damaged components when a satisfactory repair is not possible. |
Installation reference: Required clearances, fixing spacing, adhesive curing times, and alignment tolerances depend on the panel construction, substrate, and installation system. Use the applicable product instructions for these values. A visual inspection and gentle hand check do not establish load-bearing capacity; shelves, televisions, and other heavy items require suitable attachment to structural support.